_NeT_AnGeLs_
Help page for RtCW
A successful game is one where EVERYONE has a good time. If I win, that's
just a bonus. The only bad games are those where people go away unhappy.
Introduction
This is not intended to be an all-encompassing treatise on RTCW tactics nor
does it address any specific type of game play such as Checkpoint (CP),
Stopwatch (SP), or 1 vs. 1 shootouts, etc. Instead, I've tried to capture or
document some tips and tricks that have worked for me in Quake II and III:Arena.
Many of these lessons were learned playing Quake, but others come from my
tactical experience from the military, airsoft, and paintball - most of which
are surprisingly applicable to RTCW and other first person shooters (FPS). This
document also primarily focuses on head-to-head on-line competition with other
players, but many of these concepts absolutely hold true for single player
games.
I realize that this document is long and you shouldn't have any expectations
that you can read through it one and immediately do everything that is
discussed. It takes a lot of practice. Work on one piece until you have it
right, and then tackle the next. I think that you'll find the game is a lot more
exciting when you can bump your mental game up a couple of notches.
One of the reasons for this article is to dispel the myth that FPS games are
no more than simple 'run-n'-gun' games. A tight game of cat and mouse between 2
teams of tactically savvy players is incredibly fun and being mentally sharp
counts as much as having the fastest trigger finger.
This document is broken up into five main sections:
- Develop Basic Skills. Addresses the basic requirement
for effective in-game control of your player
- Know The Game. Talks about the game environment and
how you interact with it.
- Think Tactically. Discusses how you think
through a game. Attempts to build a deeper appreciation for the tactical nuances
of RTCW, or any FPS for that matter.
- Advanced Topics
- Sources
Develop Basic Skills
These are the
basic ABCs of the game. The points here only address fundamental movement
techniques. There are other sites that do a much better job of explaining this,
but the points have been included for the sake of completeness.
Use a mouse-keyboard setup
This is as basic
as it gets. While there are other ways of controlling your player, such as
joysticks and trackball, at minimum, you should be comfortable using the
mouse-keyboard combination. There is too much going on to rely solely on a
keyboard for all of your looking, shooting, and running. Get used to freelook
and play with a mouse.
- When using the mouse, you should be able to look 180 degrees simply by
twisting your hand at the wrist.
- Avoid moving your entire arm since it's hard to get the entire arm moving,
hard to get it stopped, and you'll tire quickly.
- Use the fingers to pull the mouse into your wrist or push it out to look up
and down.
- When you shoot with MOUSE1, especially at long distances with a sniping
weapon, don't stab down at the button, gently apply pressure until you shoot. If
you hit it too hard, you're most likely pushing your mouse back towards you and
throwing off your aim.
Back to Top
Stay in motion
Don't stop moving unless you
have a good reason. If you stop too long, you're dead, plain and simple. Most
newbies stop moving because they can't shoot on the run. Moving and shooting
accurately are independent. Tweak your controls
until you do both comfortably. You need to learn how to combine them together
effectively. My advice is this,learn. Practice with a friend to develop this
skill in a low stress environment.
Back to Top
Get comfortable running backwards
Tactically,
you want to learn how to run backwards to return fire as people chase you or to
avoid presenting your blind side while you run into dead-ends to pick up items.
- Once you've perfected your mouse flick, try running forward, jumping,
mouse-flicking to execute a 180, then simultaneously shifting to running
backwards.
- You can use this technique when you run into alcoves to pick up items so
that you never present your back to your opponent.
- This is also useful when you are being chased. Often times your opponent is
so intent on chasing you that he becomes an easy target.
Back to Top
Mouse-flicks
A mouse-flick is the trick of
rapidly executing a 180-turn by quickly flicking your mouse left or right.
- With practice, you should be able to execute a perfect 90 or 180-degree turn
every time.
- Practice in a map with plenty of running space and try a 180-degree
mouse-flick then fire when you land (or when you complete the 180).
- Adjust the sensitivity of your mouse to the point where you can control your
crosshair easily but still have the range of motion to execute a 180.
- Next, try running backwards then use a mouse-flick to turn around while you
simultaneously change to running forwards.
Back to Top
Circle-strafing
This is simply strafing left
or right in a large circle. You want to learn this to dodge enemy fire while
still being able to shoot back.
- Find an object to shoot at in a map/room with plenty of space to move
around.
- Strafe left or right while using your mouse, to move your crosshair in the
opposite direction. The effect will be that your crosshair stays on target while
you circle around him. Keep firing while you do this.
- Try strafing in the opposite direction. Now try to alternate between
strafing left and right while keeping your crosshair on the target. If you're
doing this correctly you should be pumping a steady stream of fire into your
target while staying constantly on the move.
- Another technique is to move closer or further away from your target while
your circle strafing. This is especially effective against rocket launchers
aimed at your feet since it's harder to predict shots in 2 dimensions than 1.
- However, make sure you don't develop a pattern in this as well. Try to
randomly go inwards and outwards of the circle, it will be harder for your
opponent to predict where you will be next.
Back to Top
Tweak your controls
Ultimately, you want to
have the simplest command set possible while making all of your important
weapons and commands accessible.
- Write all of your key bindings and scripts into an
autoexec.cfg
file that is kept in your [gamdir]/main/ folder.
I try to keep all of my commands on the left of and including the keys
6-T-G-B. This is as far as my hand can comfortable span.
Try not to make key bindings too complex or you will get confused in the
middle of a game.
Conserve keys. If you have two commands that are mutually exclusive (e.g.,
First person view OR third person view) bind them to one key using a toggle
command instead of using 2 keys for separate set commands. See my scripting tutorial to
learn more about toggles.
Back to Top
Practice
Grab a friend, set up a simple LAN
game between the two of you, and spend a few minutes practicing basic skills in
a low stress environment. If you live close enough, I would call them or use a
VoIP (Voice over IP) application like Roger Wilco to coordinate your practice
section.
- Have one person stand still and try to circle-strafe around him. Do this
again but shoot at him while he moves. Can you hit him? Now switch places.
- Learn how to do the basic functions for each class. Start off on Beach and
practice blowing the breaches. If you're working with a buddy, practice having
one person plant the dynamite, while the other person guards. Practice, whipping
out the syringe and reviving a buddy. You can do this by having one person
binding a key to "kill", which will make him wounded and give you the chance to
practice revivals.
- On the same map, stand by various points in the map, have your friend run
around and listen for the audio cues. Can you guess where he is based on the
audio cues? Have him try to surprise you. Can you surprise him?
Back to Top
Know The Game
Now that you are comfortable
with the basic movement techniques, it's time to broaden your scope and think
about where you're going to fight and with what weapons and tools.
Maps
It helps a lot if you know the terrain
that you're fighting on. There is nothing more frustrating then losing a game
because you're constantly getting lost or you haven't figured out where the
objectives are. If you're playing on a server with a published map rotation or
you know what maps are going to be played, download the maps and spend a couple
minutes in a private server just running around, seeing where everything is, and
figuring how to get to various items.
For a more thorough discussion on how to learn a map, visit my article on
Map Reconnaisance
Back to Top
Weapons
Know where all your weapons are
located on your controls set up. Get your autoexec set up just right so that all
of your most commonly used weapons and tools are within easy reach. Simple
scripts, such as weapons toggles, can also make this easier. Choose the right
weapon for the job. Every game tries to balance the weapons so that each one has
advantages and disadvantages. No weapon is perfect for all occasions. Learn what
each weapon can do, under what circumstances it is most useful, and what its
downsides are. Here's a partial damage table:
Much thanks to DarkThought and Mango65 for taking the
time to figure this out and Kefka Floyd for the additional testing with the
flamethrower and venom cannon
Weapons Damage Table
| Weapon |
Damage - Body Shot |
Damage - Head Shot |
Rate of Fire |
| Thompson |
18 |
50 |
5 rds/sec |
| MP 40 |
14 |
50 |
6 rds/sec |
| Sten |
14 |
50 |
3.3 - 3.8 rds/sec average to
empty mag, ~6 for a single
burst |
| Luger |
18 |
50 |
TBD |
| Colt .45 |
18 |
50 |
TBD |
| Mauser |
80 |
Instant kill |
TBD |
| Venom Cannon |
20 |
20 |
19-20 |
| Flamethrower |
~30 points for a direct hit,
one squirt stays in
place for ~ 3/4 sec |
14-15 fuel points per sec |
| Panzerfaust |
See diagram below |
Depends on recharge time |
| Knife |
101 if knifing in the back 'sweet spot',
10-12
anywhere else |
NA |
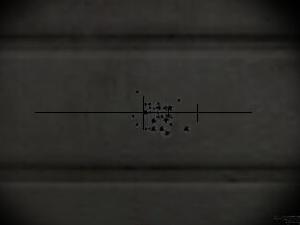
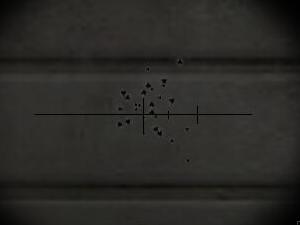
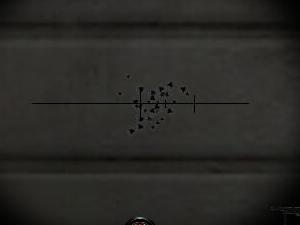
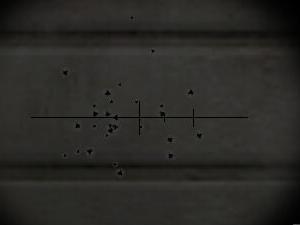
Weapons Accuracy
 I conducted a weapons accuracy test
with the Thompson, MP-40, and Sten. Each weapon was tested on rate of fire and
accuracy. For the test range, I used on the Allied spawn point on Assault. Rate
of fire was evaluated in terms of number of seconds require to empty a 30-round
magazine. For the Sten and MP-40, this meant dumping 2 rounds to make sure all
guns started with 30 rounds. Since the Sten cannot be fired continously, I fired
in bursts to empty the magazine as fast as possible. The number of seconds
required to empty each weapon were:
I conducted a weapons accuracy test
with the Thompson, MP-40, and Sten. Each weapon was tested on rate of fire and
accuracy. For the test range, I used on the Allied spawn point on Assault. Rate
of fire was evaluated in terms of number of seconds require to empty a 30-round
magazine. For the Sten and MP-40, this meant dumping 2 rounds to make sure all
guns started with 30 rounds. Since the Sten cannot be fired continously, I fired
in bursts to empty the magazine as fast as possible. The number of seconds
required to empty each weapon were:
- MP-40 - 5 seconds
- Thompson - 6 seconds
- Sten - 8-9 seconds. I've been told that if you measure the fire rate for 10
rounds, the Sten is actually faster, but have not measure this for myself.
Accuracy was tested by looking at impact groupings from a continous burst as
well as a series of 3-round, 5-round, and 10 round bursts. All weapons were
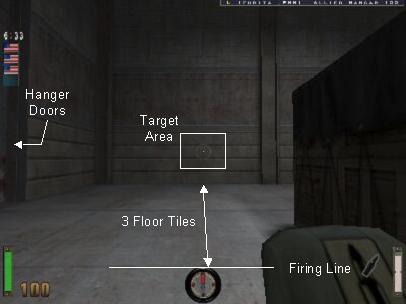
fired from the white line labeled "Firing Line" into the target area. I then
used the binoculars to zoom in on the target area and take a screenshot of the
impact marks.
Weapons were fired from a standing position approximately 3 tile lengths from
the wall.
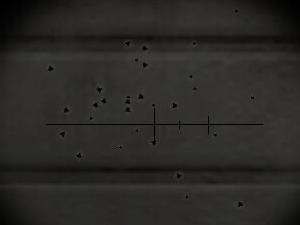
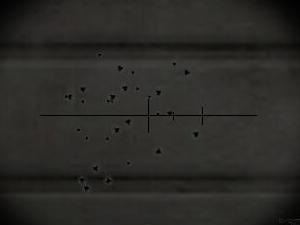
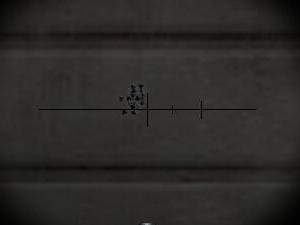
In the following screenshots, I've compared the impact patterns from the
Thompson (column 1), MP-40 (column 2), and the Sten (colum 3). The rows show the
type of bursts used: continuous (row 1), 5-round bursts (row 3), 3-round bursts
(row 2), and finally 10-round bursts (row 4). Note:The same picture is
used for all 4 Sten patterns.
Weapons Accuracy Screenshots
|
|
|
 |
 |
 |
| Thompson
- single continuous burst |
MP40
- single continuous burst |
Sten
- fired as fast as possible |
 |
 |
 |
|
| Thompson
- 3 round bursts |
MP40
- 3 round bursts |
Sten
- fired as fast as possible |
|
 |
 |
|
| Thompson
- 5 round bursts |
MP40
- 5 round bursts |
Sten
- fired as fast as possible |
|
 |
 |
|
| Thompson
- 10 round bursts |
MP40
- 10 round bursts |
Sten
- fired as fast as possible |
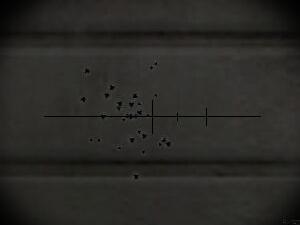
Other observations:
- Distance doesn't affect damage
- It appears there are only two damage zones, the head and the rest of the
body.
- It doesn't matter if your helmet is on
Panzerfausts
Thanks to Spaceman Spiff for
the original research and diagrams and to [D12] Crazy for explaining it all to
me.
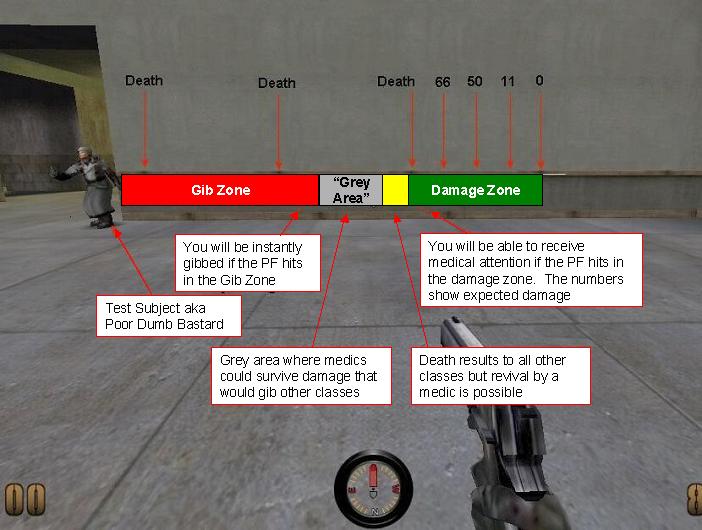
Panzerfaust Blast Radius Diagram Explained:
Starting from the left...we got the poor dumb sap just standing there. Poor
guy... The colored bars show the point of impact of the panzerfaust round.
The Gib Zone represent the total area between "Poor Dumb Bastard" and the
"Gibbed Point". If a panzerfaust hits within the red area, our "Poor Dumb
Bastard" would be gibbed with no way for a medic to revive him.
The "Grey Area" (grey) is a big question mark for medics. This means if "Poor
Dumb Bastard" is a medic with full health and the panzerfaust lands within the
grey area ... a random amount of damage is assessed that MAY OR MAY NOT kill
him. If he's not a medic however, don't worry about the distinction because
he'll will still be gibbed.
If the panzerfuast lands within the yellow area, the blast will kill "Poor
Dumb Bastard" if he is any class other than a medic. However, he can still be
revived by a medic.
If the panzerfaust lands within the Damage Zone (green), "Poor Dumb Bastard"
will take damage according to the numbers on top of the bar.
This analysis assumes that "Poor Dumb Bastard" starts with 100 health.
Artillery vs. Airstrikes
Artillery. Obviously better at hitting longer range
targets than airstrikes. Can be employed in 2 ways.
- Destroy fixed defenses. This is pretty much a no-brainer. This is how I
typically see artillery employed, to fire on groups of defenders who may be
fixed in place because they're defending an objective like the comm tower.
- Deny access or passage. Maybe it's just me, but I don't see this application
used much. Since artillery gives visibible signals that it's coming in, and
lasts for a period of time (4 rounds) people avoid the blast area. You can use
this to prevent movement through certain areas or channel enemy movement areas
into more advantageous engagement areas. (e.g., bottle up in spawn site, deny
reinforcing movement). For example, an arty strike at the foot of the ladder
leading to the comm tower, can choke off the flow of reinforcements from the
allied spawn site to the defenders around the comm tower.
Air Strikes. Short range but clears a large area
quickly. Significant danger close issues. Leaves a nice cloud of covering smoke.
- Air strikes are best utilized to clear an area that friendly forces have
just vacated thereby giving some cover and breathing room, or to clear an area
that friendly forces will move into to clear enemies and provide cover. This has
to be pretty carefully synchronized and people have to be careful not to run
into the smoke until after the airstrike.
- However, when used in the assault, an airstrike marker will typically make
all the enemies run away and then, if all the attacking forces begin a sprint
move immediately after the last blast, the resulting cloud of smoke provides
good concealment (not cover) to move onto an objective. This not only helps you
move across open kill zones, but if you move fast enough, you can move into far
side cover, out of sight of the enemy and cause them to lose track of you -
disrupting their defense.
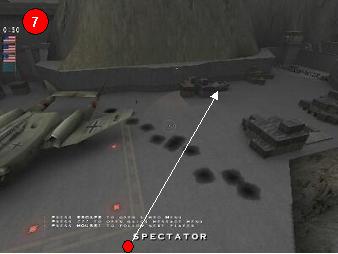
Directing Airstrikes
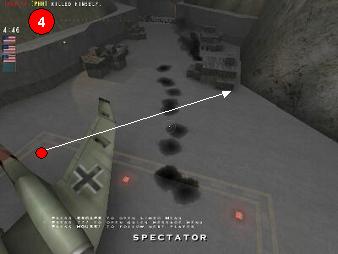
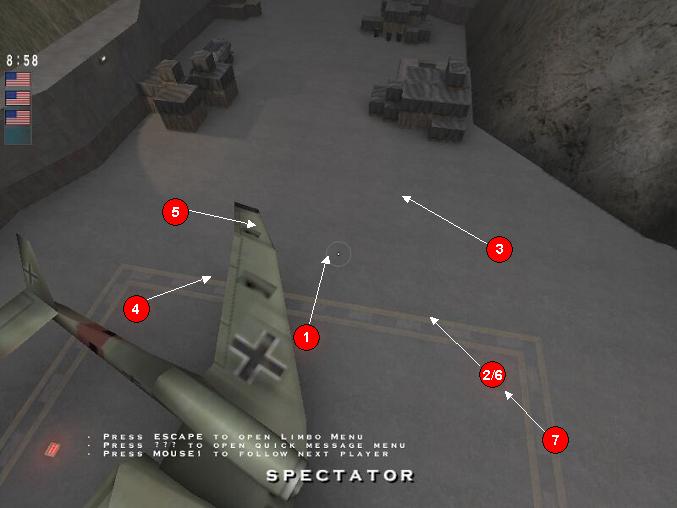 I conducted an
experiment on Assault where I threw airstrike cannisters from the same spot
(center light just under the aircraft's wing) 5 times and then ran to a
different spot on the map (# 1-5). In #6-7. I threw the smoke twice from the
same spot (#6) but on #7 ran backwards after tossing the smoke cannister.
I conducted an
experiment on Assault where I threw airstrike cannisters from the same spot
(center light just under the aircraft's wing) 5 times and then ran to a
different spot on the map (# 1-5). In #6-7. I threw the smoke twice from the
same spot (#6) but on #7 ran backwards after tossing the smoke cannister.
Did you know that you can control where your airstrikes will impact after you
toss the airstrike cannister (aka smoke grenade)? Typically, if you throw the
airstrike cannister and stand still, the airstrike will impact a rectangular
area centered on the smoke grenade and running nearly perpendicular to you
(doesn't seem to always be perfectly perpendicular). However, you can adjust the
impact area in two ways.
First, you can make the airstrike land further away from the airstrike
cannister by backing up once the cannister is thrown. The airstrike should move
away from the cannister the same distance you backed off. Just be careful that
you don't move so far that the point of impact ends up in a place the pilot
can't see or the airstrike may be aborted.
|
|
 |
 |
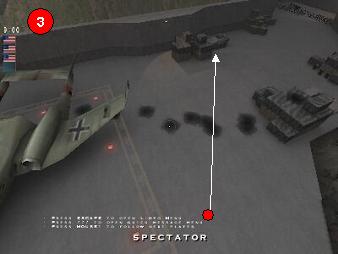
| I
stood on the corner light, tossed smoke, and then stood still. Notice that the
airstrike's impact doesn't always fall at a 90 degree angle to my point of
view |
Next,
I threw smoke from the corner light, but ran directly backwards for 2 seconds.
The airstrike impacted a little further away than on my first
toss. |
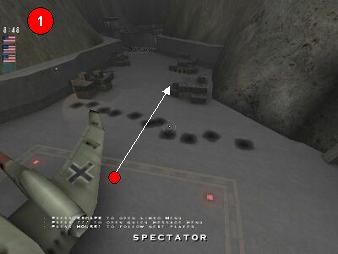
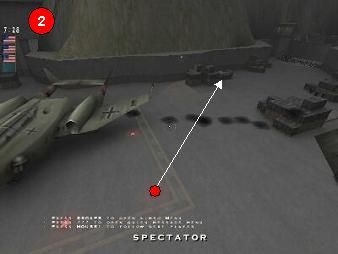
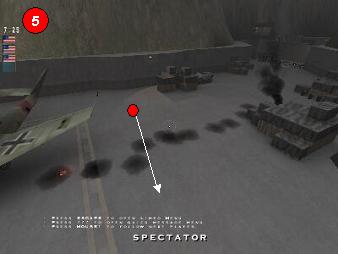
The second method is to move and rotate your point of view. Try throwing the
airstrike marker, strafing right a comfortable distance, and then making a 45%
left turn. The airstrike will still land on top of the smoke grenade, but now,
it will impact diagonally from where you tossed the cannister
|
|
 |
 |
| The
first illustration shows the strike pattern after standing at #1, tossing the
smoke, and then not moving. For all subsequent airtrikes, I threw the smoke
grenade from location #1 and maintained a consistant direction and distance of
throw |
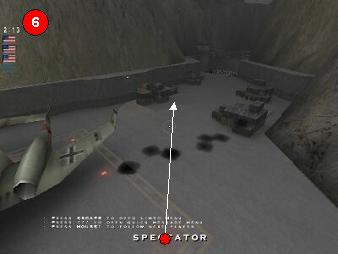
Here,
I threw the smoke from #1, strafed to #2, and then looked towards the halftrack.
You'll noticed that spots #2 - 4 form a semicircle around the spot the smoke
cannister lands. You can see how the impact marks have rotated about 60
degrees |
 |
 |
| Again,
I threw the smoke cannister from #1, ran all the way over to point #3 and looked
towards the halftrack. Here I get just a little more rotation than from point
#2 |
Next,
I repeated the same steps but from the other side. I ran over the left hand
corner light and the looked at the rightmost edge of the crates |
 |
|
| Lastly,
I tossed smoke from #1, ran all the way over to point #5 and looked parallel
along the airstrip markings. I get nearly a full 90 degree rotation from my
point #1 results |
Back to Top
Think Tactically
By now, you should be
comfortable moving smoothly through maps. You know where to go and how to get
there. Let's now talk about how to play smarter than your opponent, maintain the
initiative, and dictate the flow of the game. These principles don't necessarily
apply to every type of game play or even every map. Tailor them to your
situation as you see fit.
You want to control the game by getting your strategy going or by preventing
the other player from getting into his rhythm. This can be done by controlling
key objectives, chokepoints, or spawn points, thereby forcing your opponent to
constantly react to your moves.
Keep your cool
Everyone blows theirs,
especially if they get into a bit of trouble early in the game. However, the
best players/team recover quickly or just don't let it get to them.
- The important thing to remember is what ends the game. Sometimes, it's a set
time limit. For other game type, the game doesn't end until the final objective
has been taken. When you're playing for specific objectives, then the number
that counts is what your team has at then end.
- Think rationally about why you got tagged so quickly so many times. It might
have been luck, or you might have been caught in a chokepoint a few times in a
row. You might be showing some hesitation because it's an unfamiliar map.
- Adjust your playing style as necessary to compensate. On new maps, I adjust
to play more defensively and watch what other people do.
- Avoid getting angry when playing. You may think this will help fuel your
fragging, but it will make you more jittery. You need to stay calm so that you
can maintain your aim and keep thinking straight.
- Continue to kick ass.
Back to Top
Watch and learn from your opponents
Scope out
how your opponents are playing and that will give you a better sense for the
strategies you'll need to beat them.
- Are they playing aggressively or defensively?
- If they are defensive players or tend to stay in one area, you have a lot
more freedom to plan how you want to take the fight to them.
- If they are on offense, then you constantly have to be on guard lest they
surprise you. This may mean that any rest or listening breaks are done seldom
and finished quickly.
- The best way to learn any game is to play against people who are better than
you. Play against them as often as possible and watch their technique. If
they're really cool, they might even share some of their tips with you.
Back to Top
Avoid predictability
When I first started
playing FPS games, the single biggest problem I saw in myself was that I could
always be counted on the chase after a target. I usually got a bullet to the
head for my troubles.
- Don't always run in straight lines. Zigzagging as you run, even when you
think you're alone is permitted.
- Don't circulate the map or portions of a map in the same pattern. I still
find myself doing this and it's easy to get stuck on a set route you use to
navigate a map. A smart opponent will pick up on this and be able to anticipate
where you will go and therefore wait for you on his terms.
- Don't circle-strafe in the same direction all the time. The point of circle
strafing is to dodge fire. But if you're going to keep moving in the same
direction, it's easy really easy to lead you. Change it up every now and then.
Back to Top
Learn when to run away
- Run away when you no longer have the advantage in a firefight (e.g., when
you are outnumbered and nearly out of life).
- Sometimes you will want to run away even when you have ammo or health:
- Run away and immediately double back. If your opponent is chasing you,
thinking that you've run out of ammo, you may surprise him and gain the upper
hand.
- If your opponent has guessed that you are trying to get behind him, he may
have doubled back, trying to cut you off. He may have turned his back to you,
giving you the chance to catch him unaware.
- This is also a part of not being predictable. If you run away even when you
have ammo, especially after pulling some really good ambushes, your opponent is
more likely to not immediately try to chase you down when you run. This gives
you valuable breathing space when you REALLY DO NEED to run away because of low
ammo, you're hurt, or he has the upper hand.
- When running away, try to run backwards, but ensure you still check your
back often. This allows you to run away while preserving your ability to return
fire. Keep in mind that you sacrifice speed for security.
Back to Top
Maintain situational awareness
Maintaining
your situational awareness is the art of knowing what is going on in the map at
any given point in time. If you watch any Quake 2 demo featuring Thresh, then
you know what I'm talking about. Thresh seems to know exactly where his opponent
is going, when they're going to pop out of a door, when they're going for armor,
etc. This lets him get a lot of frags before the other player even has a chance
to react.
- Look behind you every now and then. I can't count all the times that I've
followed someone around the map and they never noticed I was there.
- When you cross corridors, take a quick look left and right.
- Listen for audio cues to discern where the other player is and where he is
going.
- Keep tabs on when key objectives have been taken, especially true when a new
spawn point has been taken
- Don't get so focused on chasing down one person that you lose track of other
people who may be gunning for you.
Back to Top
Anticipate your opponent's moves
People are
predictable and you should take advantage of that. During games, observe your
opponent:
- Does he move predictably? For example, do he always strafe-left or circulate
the map in a clockwise direction? Picking up on these patterns will enable you
to anticipate where your buddy will be and therefore get yourself in the best
position to frag them.
- Are audio cues followed by predictable actions? On certain maps, when you
hear and audio cue such an an elevator, do you just know exactly where your
enemy is and where he's heading?
- Does your opponent always chase you, only pulling back if he is out of
ammunition?
Back to Top
Keep yourself topped off
Keep your ammo and
health status in mind and don't unnecessarily call for or look for ammo or med
packs unless you need to.
- There is nothing worse than getting killed for health pack or an ammo pack
that you simply did not need.
- Don't make a habit of picking everything up unless you need it. Remember,
you have to share with the rest of your team. If I'm a medic and have picked up
at least one ammo pack, I'll leave the rest for other people.
Back to Top
Take a smart approach to doors and natural choke
points
The worst thing you can do is to walk straight through a door.
Watch how a police SWAT team takes down a room. It's an interesting exercise
that has a lot of practical applications to RTCW or any other FPS.
- Doors are natural choke points because they're narrow and restrict your
ability to move and dodge. From the shooter's perspective, it's easy to
concentrate fire into a doorway, especially with splash-damage weapons like
panzerfausts and gain easy frags.
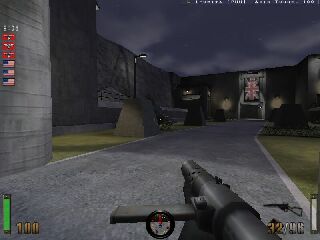
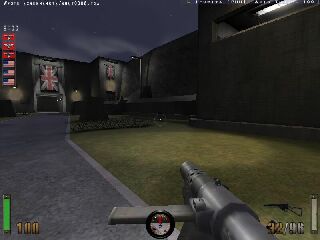
The following screenshots were taken from the Elite Forces map 'Boarding
Party'. I may or may not adapt this for RTCW.
|
|
|
 |
|
 |
| Simply
stepping through a door leaves you exposed to fire from both sides of the
corridor. |
|
Starting
from the oblique enables you control how much of cooridor the room you want to
expose yourself to at any given point. |
The audio (door opening) and visual (door opening) cues are a dead give-away
that someone is at the door, and gives your opponent that split second
advantage. There are a couple of counter measures that can be used individually
or in combination:
- Get a buddy to open the door and then have him step out of the way. If you
open the door with your body, you'll be forced to hesitate for a moment while it
opens for you, exposing you for a few moments.
- Sprint through doorways. People are going to be gunning for you and you want
to get though this constricting passages as fast as you can.
- Get close enough to the door and open it, but take a step back or to the
side. Often time, someone will shoot at a door as soon as it opens, expecting a
body to come charging through. Stepping back makes them waste that first shot
and alerts you to the presence of an opponent.
- Approach the door from the oblique. This means that you're standing off to
the side and looking through the doorway at a 45-degree angle. This gives you a
view into about 1/3 of the room while hiding your from the other 2/3. This has
most of the advantages of taking a step back, but gives you a better field of
fire into the room. You can take in the remainder of the room by circle-strafing
left or right, attack by going straight on or button-hook around to the opposite
side.
|
|
|
 |
|
 |
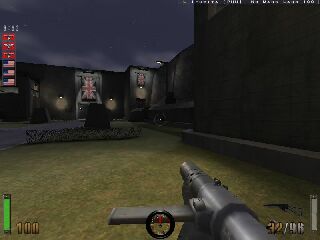
| In
this example, I'm getting ready to enter No Man's Land on the Wizernes map. I
suspect that enemy soldiers might be hiding along the walls, so I begin my by
quickly checking the wall opposite of the one I plan to move down. If there is
an enemy soldier, I'll either withdraw or shoot it out with him. |
|
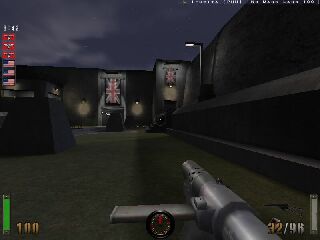
I
see there isn't anyone there, so I execute a quick button hook, clear the near
side wall, and make a quick scan of No Man's Land. |
 |
|
 |
| Once
I'm convinced there are no enemy along the near side wall, I circle-strafe
right, keeping my eyes on the center of No Man's Land and my back to the
wall. |
|
Now
I'm up along the right hand wall and ready to move down to the far tunnel. At no
time do my eyes leave No Man's Land and the activity along the right wall. |
 |
|
 |
| As
I move down the right wall, I move at the oblique so that my gun stays trained
into the center of No Man's Land. I do this so that my gun is ready and so that
I can take in as much of the action as possible. I can also see the destroyable
Allied side entrance so if something develops up there, I can quickly run up the
stairs to assist |
|
I
finish near the far tunnel, ready to move into a blocking position or stage for
the next push to the Allied far side spawn point |
Back to Top
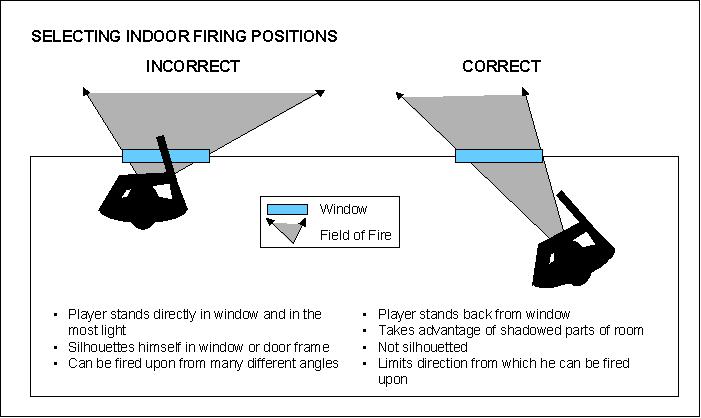
Don't silhouette yourself doors and
windows
There is no sound-tactical reason to stand directly in a door
or window to shoot out.
- Standing directly in front of or in doors and windows silhouettes you
perfectly for anyone who wants to return fire.
- Door and window frames make you vulnerable to splash damage.
- Instead, take a step or two back from the door. It's still as easy for you
to shoot into a room and actually reduces the area inside the room from which
people can see you. Plus you retain your peripheral vision to see people coming
down the hall.
- Stepping back will most likely put you into more shadows.
- It also gives you a little more room to maneuver to incoming fire or if you
get surprised.
 Back to Top
Use prep fire when available
This can be
really useful if you have a lot of ammo, and you know the opponent is probably
set up in a defensive position, for example, the map room on Beach. Often times
as I enter a room or approach and elbow in a corridor, I will toss a grenade
just before I go in. This does several things:
- If I think someone might be coming around the same corner, you can surprise
him or her with an area effect weapon. Since they have no idea that you are
around the corner, they probably won't have the opportunity to dodge out of the
way.
- If someone is waiting to ambush you, the suppressive fire can cause him or
her to break ambush early, thereby saving your skin. If the person simply
happens to be coming down the same corridor, it could cause them to hold up and
try to figure out where you are shooting from which buys a couple of moments to
gain the advantage.
- Naturally, the benefits of this should be weighed against the disadvantage
of potentially giving your position away.
Back to Top
Strafe around corners
A lot of players stop
at intersections, turn, and then proceed on their merry way. Unfortunately, this
causes you to stop for a moment and creates a situation where you are not
looking at where you are most likely to encounter an unexpected opponent.
- Always keep your crosshairs centered on the corridor, door, or path that you
intent to use.
- As you approach the opening, circle-strafe left or right so that your
crosshairs stay on target, but your model is swinging around in alignment with
the door.
- Once you're lined up the way you want and you're convinced the coast is
clear, make your entry.
- This ensures that you are always ready to shoot if someone pops out of the
entry.
Back to Top
Backtrack occasionally
Every now and then, do
a quick mouse-flick, turn around and backtrack. It's healthy to look behind you
every now and then and see if anyone is chasing you. This also helps you be a
little less predictable.
Back to Top
Avoid natural kill zones
Many maps are
designed to funnel the action around key areas or items. The last place you want
to be is standing in the middle of those places.
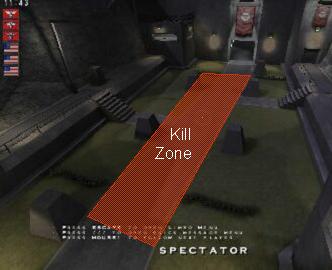 No
Man's Land in the Wizernes map is a good example. It has a large open area that
must be crossed, but there is no reason to run down the middle road and be the
target for every enemy soldier or get caught in the cross fire from team mates.
Stay out of the shaded kill zone and work you way around the edges instead.
No
Man's Land in the Wizernes map is a good example. It has a large open area that
must be crossed, but there is no reason to run down the middle road and be the
target for every enemy soldier or get caught in the cross fire from team mates.
Stay out of the shaded kill zone and work you way around the edges instead.
- This is especially true in certain maps were all the action is funneled into
arenas (like Wizernes) where you might have 8-12 people exchanging fire back and
forth across No Man's Land. Why would you want to be in the middle of that? Stay
on the periphery of these areas and shoot into and across the kill zone.
- By staying on the edges and keeping your back to the wall, you only have to
keep track of your left, right, and front. If you're in the middle, you have to
keep track of all 360 degrees.
- You become less of an easy target. People will typically shoot at the
easiest kill. You just don't want 8 people to see you as the easiest kill.
- By staying back, you can also keep better track of what's going on thereby
letting you play smarter with your ammunition and shots. Watch who is getting
hurt and go for the easy kill. Gang up on the same target as a teammate for
faster kills.
Back to Top
Getting your groove back
Sometimes all the
stars are aligned; you run the maps beautifully, every shot hits, you're
absolutely untouchable. Then, all of a sudden, your game goes to crap. Now
you're always lost, you couldn't hit yourself with the panzerfaust, and every
grenade seems to have your name. Sounds like it's time to take a step back and
analyze what's going on. Ask yourself a couple of questions and see if they lead
to any revealing answers
- Are you playing on new maps
- How well do you know the maps?
- Are you spending more time thinking about navigating the maps than you used
to?
- Are you playing on maps that you simply don't play well on? Personally, I do
very poorly on certain maps.
- Have new players been introduced
- Has the total number of players increased? In servers with large numbers of
players, especially on small maps, this may put a lot of additional pressure on
people who are used to having that extra moment to line up their shots.
- How good are the new players? How can you adjust your game style to
compensate? What techniques do you need to work on?
- Are you playing on a new server?
- The server may be running a mod that changes tge game in a different than
you are used to.
- Is there new weapons or equipment being used?
- How does the ping and lag compare with your regular server? Have you
compensated yet?
- What else has changed?
Back to Top
Advanced Topics
I've written up a couple of
other articles about more advanced team tactics and techniques. Later, I'll add
links to some pieces written by others. Hope you find them useful.
Voice
communications
Map reconnaisance
Basic small team
tactics
Back to Top
Sources
References
- Official Quake II Strategies & Secrets
- Prima Guide to Quake III
- Planetquake Quake III Game Guide
- FM 90-10-1, An Infantryman's Guide to Urban Combat
- FM 21-75, Combat Skills of the Soldier
Contributors
- Ifurita (editor)
- Sam The Small
Back to Top